Financial dimension lookup #MSDyn365FO

Hi Folks! Unfortunately, the useful function SysLookup::lookupDimension() was removed from Dynamics 365 for finance and operations

http://blog.daxteam.net/2015/04/dimenson-value-lookup-by-code-dynamics.html

Now you can find below the alternative to build a lookup based on a financial Dimension, using event handlers on dyn365fo:

    [FormControlEventHandler(formControlStr(SalesLineBackOrder, BusinessLineFilter), FormControlEventType::Lookup)]
    public static void BusinessLineFilter_OnLookup(FormControl sender, FormControlEventArgs e)
    {
        SysTableLookup                      sysTableLookup;
        Query                               query;
        QueryBuildDataSource                qbdsDimensionFinancialTag;
        QueryBuildRange                     qbrFinancialTagCategory;
        #define.BusinessLine('BusinessLine')

        query = new Query();
        qbdsDimensionFinancialTag = query.addDataSource(tableNum(DimensionFinancialTag));
        qbrFinancialTagCategory = qbdsDimensionFinancialTag.addRange(fieldNum(DimensionFinancialTag, FinancialTagCategory));
        qbrFinancialTagCategory.value(strFmt('%1', DimensionAttribute::findByName(#BusinessLine, false).financialTagCategory()));

        sysTableLookup = sysTableLookup::newParameters(tableNum(DimensionFinancialTag), sender);
        sysTableLookup.addLookupfield(fieldNum(DimensionFinancialTag, Value), true);
        sysTableLookup.addLookupfield(fieldNum(DimensionFinancialTag, Description));
        sysTableLookup.addSelectionField(fieldNum(DimensionFinancialTag, FinancialTagCategory));
        sysTableLookup.parmQuery(query);

        sysTableLookup.performFormLookup();
    }

What’s new or changed in Dynamics 365 for Finance and Operations version 8.0

With version 8.0, and going forward, Microsoft is no longer offering separate editions (Business edition and Enterprise edition). The product name for this Dynamics 365 application is Microsoft Dynamics 365 for Finance and Operations.

In the technical context we now have customizations through extensions only, so migrating customizations from one release to the next has been moved away from over-layering to the use of extensions.

Check out the entire list of changes here and you can also download the full spring ’18 release notes here.

How to send an e-mail in AX 7 using x++

I know that is a well known subject when we’re speaking about x++ but it’s always helpful for new developers or when somebody is in a hurry and needs a quick answer.

In the previous versions of AX we had the SysMailer class for send e-mails trough x++ using just two lines of code.

Probably you already know about the several changes that happened for the developer’s point of view in AX7 and this simple task was one of these, but do not worry because it’s still very simple, see the code bellow as an example:

public static void main(Args _args)
{
    SysMailerMessageBuilder mailer  = new SysMailerMessageBuilder();;
    SysMailerSMTP           smtp    = new SysMailerSMTP();
    try
    {
        mailer.setSubject("AX7 - Sending e-mail through x++");
        mailer.setFrom("axforce@axforce.com");
        mailer.setBody("Axforce.wordpress.com");
        mailer.addTo("mchiovitti@axforce.com");
        mailer.addAttachmentFromFile(@"\\10.1.6.249\xml\test.pdf");

        smtp.sendNonInteractive(mailer.getMessage());
    }
    catch(Exception::CLRError)
    {
        error(CLRInterop::getLastException().toString());
    }
}

Silly code but I’m sure that will be helpful for someone.

See you guys next time. 🙂

AX7 – Setup continuos build & Test automation on a local VM PT2

Prepare for build:

This task should perform a database & packages backup and import/update all the necessary windows registry. Add a PowerShell task and point to the PrepareForBuild.ps1  script:

Prepare for build

Arguments: -DynamicsSDKPath(“C:\DynamicsSDK”) -VSO_ProjectCollection(“https://xxxx.visualstudio.com/DefaultCollection/”)

There arguments must be provided because they are dynamic and you should inform therefore the script can read and create them as windows registry:

win registry

Backups:

bkpFolder

Be careful with this scrip because after the backup it’s done it will perform a restore with the same backups as an attempt of maintain the test scenarios, so do not stop the task in the middle or something like these.

It won’t perform a new backup if there already is one older backup in the backup folder. In this case I recommend to create a copy task before this one.

Build Solution:

This task should perform a full build of your working packages. Create a MSBuild task and point to the AXModulesBuild.proj file. Basically what this project are going to do is call and execute several files located on the DynamicsSDK folder.

BuildSolution

Arguments:

  • Platform: Use your predefined variable to set if it is a 64 bits or a 32 bits application.
  • Configuration: Use your predefined variable to set the platform configuration.
  • MSBuildArguments:
    •  /p:OutputPath=”$(Agent.BuildDirectory)\Packages”.
    •  /p:LogPath=”$(Agent.BuildDirectory)\Packages\log.xml”
  • MSBuid: It depends of your visual studio version. In my case that was the 14.0 (VS2015).
  • MSBuild Architecture: 64 ou 32 bits, it depends of your S.O.

The purpose of the output and log arguments is to define where is the built packages and where to put the log file.

Deploy Reports:

With this step you can deploy all SRSS reports at once. Add a PowerShell task and point it DeploySSRSReports.ps1 file.

deploySRSS

Arguments: -DeployReports(“True”)
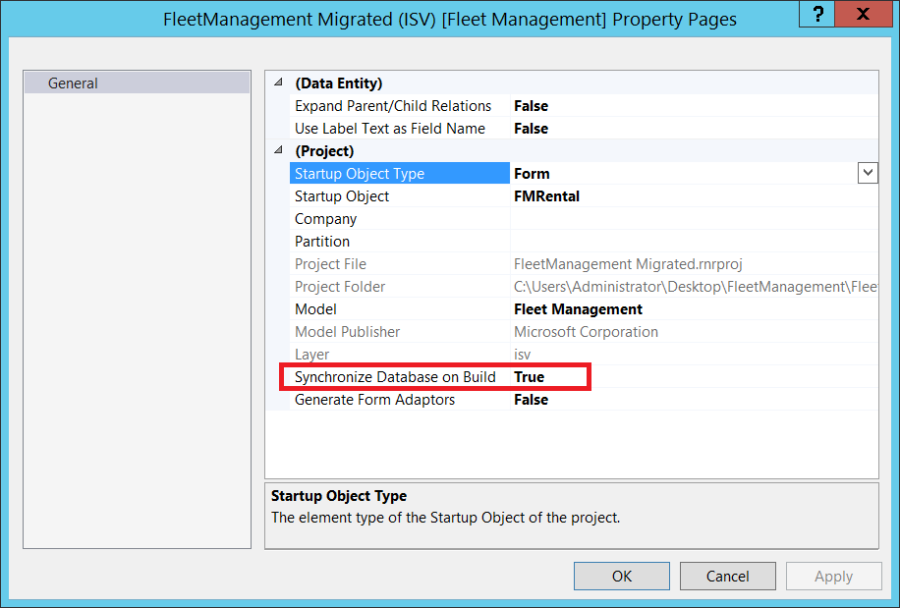
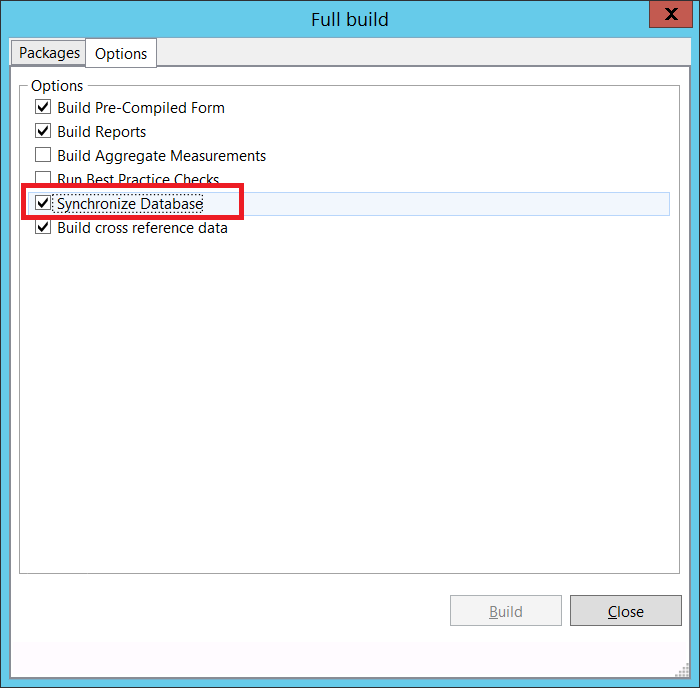
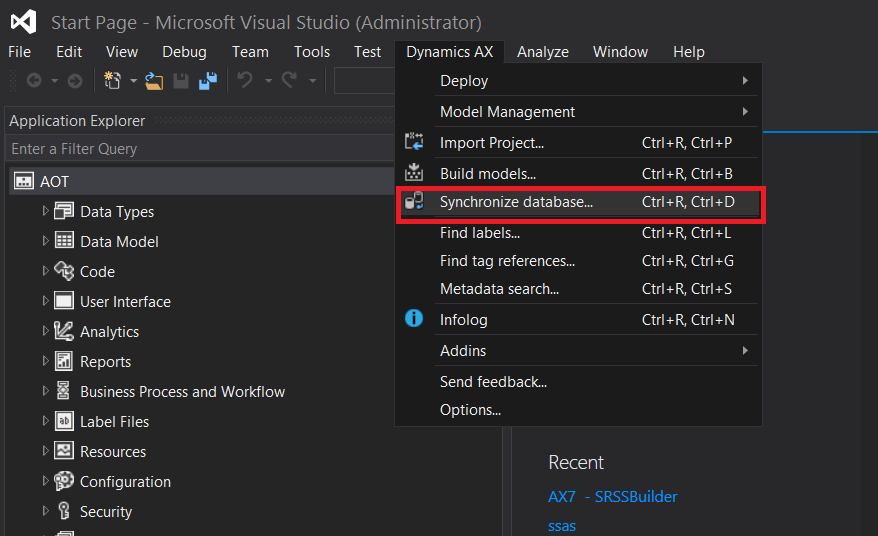
Database Sync:

This step will perform a full database synchronize. Add a MSBuild task and point to the SyncEngine.proj:

data sync

  • MSBuid: It depends of your visual studio version. In my case that was the 14.0 (VS2015).
  • MSBuild Architecture: 64 ou 32 bits, it depends of your S.O.

Generate Packages:

There is no point doing the previous steps without generate a new deployable package and that is what we’re going to do in this step. Add a PowerShell task and point it to the “GeneratePackage.ps1″:

generatePackages

Arguments:

  • -BuildPackagePath “$(Agent.BuildDirectory)\Packages” – The path where to produce the deployable packages.
  • -BuildMetadataPath “$(Agent.BuildDirectory)\Packages” – The path to the build metadata.
  • -BuildBinPath “$(Agent.BuildDirectory)\Bin” The path to the build binaries.

Publish Deployable Package:

With this task we’re able to upload the previous created deployable package to VSTS. Add a Copy and Publish Build Artifacts task and setup it as follow:

copyAndpublish

  • CopyRoot: $(Agent.BuildDirectory)
  • Contents: Packages\*.zip
  • Artifact Name: Packages
  • Artifact Type: Server

Each of these parameters are telling were to find the deployable packages and where it should be uploaded:

publish1


Test start:

This step get done the necessary step for the unit test execution. Add a PowerShell task and point it to the “TestStart.ps1file:

TSTSTART

Basically what this is import the “DynamicsSDKCommon.psm1″  module file again and start the Microsoft Dynamics AX Batch Management Service:

tstSvc

Arguments: -BuildNumber “$(BUILD_BUILDNUMBER)” – The current build number.

Visual Studio Test:

If you aren’t used to the test framework from AX you should read this first. The test framework it’s a powerful tool which provide us to schedule test functionality’s and analyse results through code and in large scale.

Depending on the the order that you use in your build, you can use this step as a required step for the deployable package generation and know when exactly some particular scenario stop  from working. Anyway, there are several scenarios where this tool can be well used.

Add a VS Test task and setup as follow:

tstSetup

  • Test Assembly: $(Agent.BuildDirectory)\Packages\*\Bin\$(TestAssembly) – Speciefies where is the location from the test assembly files that is the .dll from test package.
  • Test Filter:$(TestFilter) use this if you want to filter some particular test.
  • Run Settings File: Point to your settings file. This should be use if you want to change any particulars option on the test run. In my case I changed the location of the test result file and .NET framework version:runSettingsxml

You can get a template from this .xml file and more information about the tags here.

  • Code coverage: false
  • Upload Test Attachments:True
  • Other console options: /UseVsixExtensions:true

tstResult

Test end:

This step end the test execution and it requires the same parameters from the test start task. Add a PowerShell task and point it to the “TestEnd.ps1file:

tstEnd

Schedule:

Go to Trigger tab page and flag the schedule checkbox and setup the time that best suit you.

Trigger

Thanks for you time guys.

AX7 – Setup continuos build & Test automation on a local VM PT1

Hi Guys,

I would like to speak about this powerful tool that we have on AX7 now. I couldn’t find much about it on the internet and even the post about it on the Ax-wiki isn’t complete. For this reason I decided to write about it,  but before begin I recommend  to you became familiar with the concepts from VSTS.

Basically what we are going to do is setup a build definition inside the VSTS where each steps are responsible for perform a task inside our local environment, create a new local agent with the required permissions for execute the tasks and create a schedule for the new build as we want.

First of all you must create your own account and a new project inside VSTS and after synchronize it with your local VM. If you don’t know how to do it you can follow find an explanation about how it is done here.

You must create you folder root as the following image:

TFS

Once it is done, you have to add your files for the respective folder and perform a check-in for upload these new files for your VSTS project.

Setup a local agent:

This agent will be responsible for perform every action inside your local environment through the DynamicsSDK scripts that we previous uploaded to the VSTS account. These scripts files are located on the C:\DynamicsSDK path from your VM. See the steps below for a full explanation:

  1.  Go to your DynamicsSDK folder and unzip the agent.zip file.
  2. Run the PowerShell as administrator.
  3. Enable PowerShell to run downloaded scripts signed by trusted publishers and confirm the change in policy with the command: “Set-ExecutionPolicy RemoteSigned“.
  4. Change to directory where you unzipped the agent with the command: “cd C:\DynamicsSDK\agent” .
  5. Unblock the PowerShell scripts with the command: “Get-ChildItem -Recurse * | Unblock-File“.
  6. Run the configuration command for the agent: “\DynamicsSDK\ConfigureAgent.cmd” agent setup
  7. From now on the command line will ask you about your agent properties. Set your Agent name, the default option is “Agent-Machine name”.
  8. Enter the URL from your VSTS:                                                        “https://{your-account}.visualstudio.com“.
  9. Choose which pool you want to setup the agent. The default is ‘Default‘ pool.
  10. Enter the path of work folder for this agent. The defaul is the root folder of the agent.agent setup2
  11. Set your agent to installed as a windows service.
  12. Set the user credentials for the agent windows services. I recommend you to use the local administrator. The default option is the local service account.agent svc
  13. A Microsoft prompt should be opened for you enter with your VSTS account. After that you can see the agent status on the control panel: agent status

If you’re working with a free VSTS account this would end the agent setup, otherwise you can setup more one agent  for each pool.  The picture bellow illustrate the build architecture:

build-system-architecture

Build Definition:

I have to confess that I found these next steps a little bit trick just following the Microsoft post about it because I wasn’t used to work with VSTS.  Now that I’ve done once I can assurance you that isn’t rocket science :).

  •  Create your build definition and name it as you want.
  • Set your predefined variables at the variables tab page:Variables


The New Microsoft Dynamics AX 7 RTW

The new Microsoft Dynamics AX RTW is been around since February of this year, but this is for those who couldn’t find a way to get it.

ax7-rtw-dash

Basically, there are two modes in which Dynamics AX is deployed. A cloud environment provisioned through Dynamics Lifecycle Services (LCS) supporting different topologies or a local development virtual machine (VM) that can be downloaded from here:

https://connect.microsoft.com/site1321/Downloads/DownloadDetails.aspx?DownloadID=60417

*You need an account with enough permission to access the Microsoft Connect website.

Using Hyper-V manager, create a local Virtual Machine (VM) from the downloaded VHD. It is preferred to give your VM the recommended 16 gigabytes of memory and 2 virtual processors (do not use dynamic memory allocation).

More information available at:

https://ax.help.dynamics.com/en/wiki/access-microsoft-dynamics-ax-7-instances-2/

Database synchronization trick for AX 7

Probably all of you already know that the AX7 has the Visual Studio as its new IDE, what’s certainly a big change for us.

In this post I’ll explain what are the tools available to perform a sync database and at the end I’ll show you one trick that I’ve learned.

1 – Synchronize on project build

In the project properties you can select this option to perform a database sync after each time that you build your project. I highly recommend you to choose this option when you’re working with Tables/Views/Data Entity because it will only sync the objects that belong within your project.

ProjectDBSync

2 – Synchronize on package build

There are several options to check if you’re performing a package build and one of them is the synchronize database option.

The idea here is to perform a database sync only for the objects that belong to the package that is being built, but this is not what really happens. I’ve tried to build a smaller package with some few tables and it did a full database sync instead. 

FullBuildDBSync

Please let me know if one of you had a different result than mine.

3 – Full Synchronize

If you need to perform a full database sync you can do it at the following path:

FullDBSync

4 – Enable legacy log

In this AX7 current version there is a known issue that makes harder to get the synchronization errors. When an error happens, the application doesn’t tell you what is the cause and neither the object with error.

To be able to trace the synchronization errors you have to enable the legacy log setting straight in the VS settings file that is located in the following path:

C:\Users\Administrator\Documents\Visual Studio 2015\Settings\DynamicsDevConfig.xml

Setting:

FallBackToNative

I hope that Microsoft will fix this issue in the next product release, but in the meanwhile we can use this workaround as an alternative.

Original article here.

See you guys next time ! 🙂